
|
Game name: RVL Hacker 1. Introduction This manual is intended to help you get started with RVL Hacker. Minimum system requirements for the game: PC, running at least Windows XP 500 Mhz or faster CPU 128 Mb of RAM DirectX 8 compatible video card. Notes : - The display resolution must be set to at least 1024x768 pixels. - DirectX drivers must be installed on your computer. You may download and install them for free, from: http://www.microsoft.com/directx/ Requesting support: If you require assistance, or have any kind of questions, you may use the following resources to contact us: Website contact form: http://www.rvlgames.com/contact.php E-mail: office@rvlgames.com Forums: http://www.rvlgames.com/forum/ We will answer you within a maximum of 24 hours. 2. The game The game menu Once you have started the game, and gone through the intro, you will be presented with the main game menu:  New game Selecting this options, will allow you to start a new game. Choose a nickname of your choice for the game. Load or delete profile From here, you can load a previously saved profile, or delete a profile if you don't have any room left for more profiles. If the profile you are loading, is saved in a different game mod then the current one, then the respective game mod is loaded aswell. Options From here, you can configure several game options : - Interface skin: Choose a skin from the available ones, to use in the game. - Enable dinamic game difficulty: Checking this option, will increase the game difficulty dinamicly, based on your performance. This will also give you more score points. - Sound and music volume: Adjust the in-game sound and music volume. - Credits: Displays the game credits - Exit: Exit the game The game interface Once you start the game, you are presented with the game interface. The interface consists of 4 elements: Visual Map, Console, System Panel and Messages. Below you will find an overview of all 4 elements: The Visual Map 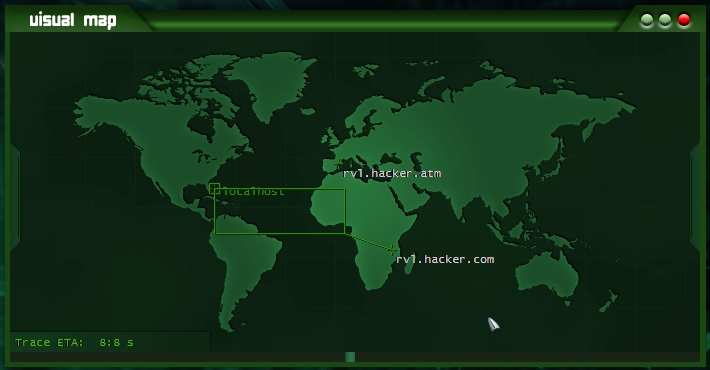 The visual map shows you the geographical position of all servers in the current level. Please note that not all servers are initially shown on the map. When you find a new server name, you can use the scan command, to have it show up on the map (if it exists), like this: SCAN server.com When you move the mouse over a server, it will show a popup window, with some brief information about the sever, such as: - how many open ports does it have - what kind of encryption key it has - money balance - number of files on the server - how many times you can bounce through the host You can right-click on the server, or use the scan command (Ex: SCAN server.com), to perform an accurate scan of the server. In the bottom left part of the Visual Map, you will see a trace progress when you are performing certain actions (such as transferring money, cracking or decrypting a server key). If the trace progress reaches 0, you are traced. You don’t immediately lose the game, but your global-trace level increases by 50%. When the global-trace level reaches 100%, you lose the game. You can see the current global-trace level in the System Panel. If your global trace level is close to 100%, you can reduce it by using the KILLTRACE command. You need to have money in your account to be able to use this command. Also, you can click on hosts, to create bounced links, before performing actions such as: cracking, decrypting or transferring money. Using bounced links will increase the trace time, and reduce the chances of being traced. To add a host to the bounced link, simply click on it. To remove a host from the bounce, click on it again. Add as many hosts as you wish; a larger bounce link means increased trace time. The bounced links can be a powerful tool if used right or just a waste of resourced if you aren't careful! Important: - You can bounce through a host for a maximum of 3 times. After that, the host is removed from the bounced link. - Every host in the bounced list must be hacked; otherwise you won't be able to connect using the bounced link. The Console  The console is your main area of operations. You can use the available commands to perform your hacking actions in order to achieve your level goals. The console simulates and abstracts an operating system command console. You can type HELP, to see a list of all available commands. You can use the Page Up and Page Down keys, to scroll through the console window. Also, when typing commands, hostnames or filenames, you can press the TAB key to use the auto completion feature. Here is a list of available commands, and their action: HELP - Displays a list of commands and their meaning. LS (or DIR) - Displays a list of files on the current server, or the localhost CAT filename - Displays the contents of a file DELETE filename - Deletes a file SCAN - Scans a host for open ports (Example: scan server.com) CONNECT SERVER [PORT] - Connects to a server on a given port. Example: connect server.com 65 If no port is specified, the connection defaults to port 80. LOGOUT - disconnects from a server. DOWNLOAD filename - downloads a file from a server UPLOAD filename - uploads a file to a server EXEC exploit server - executes an exploit on a given server CLEAR - clears the command console window CRACK SERVER [PORT] - Cracks the password for a service, running on a specified port. DECRYPT - Decrypts the encryption key of a server. TRANSFER - Transfer money from a server ABORT - Abort an ongoing transfer, download, crack, etc. CONFIG - Displays the current hardware configuration UPGRADE - Upgrades your hardware/software DOWNGRADE - Sell your hardware for 90% of it's value LOGIN - Connects to a server if the password is known BOUNCEHELP - Displays help on using bounced links BOUNCEINFO - Displays information on the current bounced link setup BOUNCE - Add/remove a server to/from the bounce link setup KILLTRACE - Will reduce your global trace level by 10%, for a price of $500 The System Panel  The System Panel window, offers an overview of your current (system) information. You will see your current score, trace level (make sure you don't reach 100%, as you will lose the level). The Dinamic difficulty factor, shows the factor by wich the game difficulty is increased (in case you have enabled this feature from the Options menu). Also, several player statistics are displayed, such as: - Available money - Number of hosts you have hacked, since you started the game (Hack count) - Number of times you have been traced (Trace count) - Information on the bounced link setup Also, when a trace is in progress, you will see the trace timer here as well. Lower, you will see your current hardware configuration. You can always see a more detailed overview of your hardware, by typing the CONFIG command in the console. You can upgrade your hardware by using the UPGRADE command. Important: Don't rush to upgrade your hardware as soon as you have money. Having the best hardware is not the main objective of the game. Carefully make your decision, and only upgrade your hardware when necessary. Money is not abundant in the game, and its main purpose is to reduce your trace time. Below the hardware configuration, you will see a progress display for the following commands (when used): crack, decrypt, transfer, upload and download. Messages  The Messages window displays the messages you receive inside the game. You can use the Prev/Next buttons to scroll through your messages. Also, you will see a display of the current message number and the total number of messages. Shortcut keys Below is a list of shortcut keys that can be used in the game: F1 - Quick help screen F2 - Displays the level objectives F3 - Displays the level overview PAUSE - Pauses the game PgUp - scroll up in the console window PgDn - scroll down in the console window TAB - command/hostname autocompletion F4 - Jump to the next track in the playlist F11 - Reduce music volume F12 - Increase music volume Gameplay concepts and explanations: Below, you will find a few tips to help you play the game better. Finding new servers: The idea behind the game, is to look for clues, and solve puzzles. When you play the game, look for hints about new hosts (in log files, notes, etc). When a level starts, you don't see all the hosts on the targetmap. Most of them must be discovered. Whenever you believe you found a new host, use the scan command to reveal it on the visual map : scan server.com Don't worry if the host doesn't show up on the map. It means the host doesn't exist. Keep looking for more. Money: When performing money transfers, if you don't use a bounced link, transfer only $1000 at a time, to avoid getting traced. Also, money plays an important role in the game. Manage it carefully. Don't start spending the money on hardware upgrades, just because you think it's cool to have it. You might find youself in a dead-end, where money is needed ... and you don't have any. Most of the level objectives can be completed without getting traced, by finding and using exploits or using bounced links. Game score: Your game score increased everytime certain actions are performed. Below is a list of what contributes to your score : - cracking a server's password - decrypting a server's encryption key - transfering money from servers - using exploits to gain access to servers Upgrades: In the game, you can purchase upgrades to help you perform most of your actions, faster or better. The following upgrades are available in the game, each one with it's advantage : - Firewall : everytime you upgrade your firewall, the tracetime is doubled. This means that you can crack/decrypt/transfer password/keys/money amounts, that are twice as large then previously. - Modem : everytime you upgrade your modem, the download/upload/money transfer speed, increases by 2. - CPU : everytime you upgrade your CPU, the speed when using the crack or decrypt commands, is doubled. - Memory : More memory, will allow you to store more files on your localhost. When using the ls command on your localhost, you can see the amount of memory available. - Neural adapter : This is a very powerfull (and expensive) hardware upgrade. Once you have it, every performance aspect of your hardware configuration is doubled. You can use the config command, to view detailed information about your hardware configuration, along with the performance gains from each upgrade. Trace: In the System Panel window, always keep an eye out on the trace percentage. Everytime you are traced, perform a crack, decrypt, etc, it's value increases. When you reach 100%, it means that you have been identified and your cover is compromised. As a result, you lose the level. You can decrease it's value, by using the killtrace command. Your global trace level increases as follows :
Bounced links: Bounced links are usefull to increase the tracetime when attempting to crack long passwords, decrypt large encryption keys, etc, when you don't have the necesarry hardware to do it, without getting traced. To add a host to the bounced link, simply click on it. To remove a host from the bounce, click on it again. Add as many hosts as you wish, a larger bounce link means increased trace time. Please note that you can't add or remove hosts to/from the bounced link, while connected. The bounced links can be a powerfull tool if used right, or just a waste of resources if you aren't carefull! Important : - You can bounce through a host for a maximum of 3 times. After that, the host is removed from the bounced link. - Every host in the bounced list must be hacked, otherwise you won't be able to connect using the bounced link. - The tracetime is multiplied by the number of hosts in the bounced links, plus 1. Example : - bouncing through 1 host : the tracetime doubles - bouncing through 3 hosts, the tracetime is 4 times as large. |
| Document last edited : August 29, 2009 4:33 PM |